Building a background swapper app with NextJS - Part II
Building our dashboard GUI reached a new milestone: setting up our back-end to accept uploads.
Building the Back-End
In the second article of this series, we'll continue developing our Next.js Background Swapper. If you haven't read the first article, I recommend checking it out:

If you'd like to dive in here, check out the git repository for the series:
Here, you can check out the repo & switch to the progress/article1_end branch if you'd like to catch up to our current starting point.
The relationship between front-end and back-end
As we discussed earlier, the front-end is responsible for rendering the graphical user interface (GUI) that users interact with. It can also manage state, such as changes users make to a photo they upload, before these changes are saved to a database. In the case of Next.js, the front-end primarily runs in the user's browser, making data sent and received easily visible through the browser's built-in developer tools. This poses a security risk when connecting to a database, as we do not want users to access our database directly.
To address this issue, we need an intermediary that can communicate securely with both the front-end and the database. This intermediary will be our back-end. The back-end will handle data querying and processing in response to the front-end's API requests, ensuring secure communication and data integrity.
The front-end and back-end are often separate applications, but in our case, they will both reside within the same Next.js application. Even though they coexist within the same project, it is helpful to think of them as separate components. This is because they have access to different tools and perform different functions.
When I have trouble understanding a system or a flow, I find it useful to create a visual representation as a helpful aid. This diagram shows the different parts of a system and the flow that happens when a user requests a page.
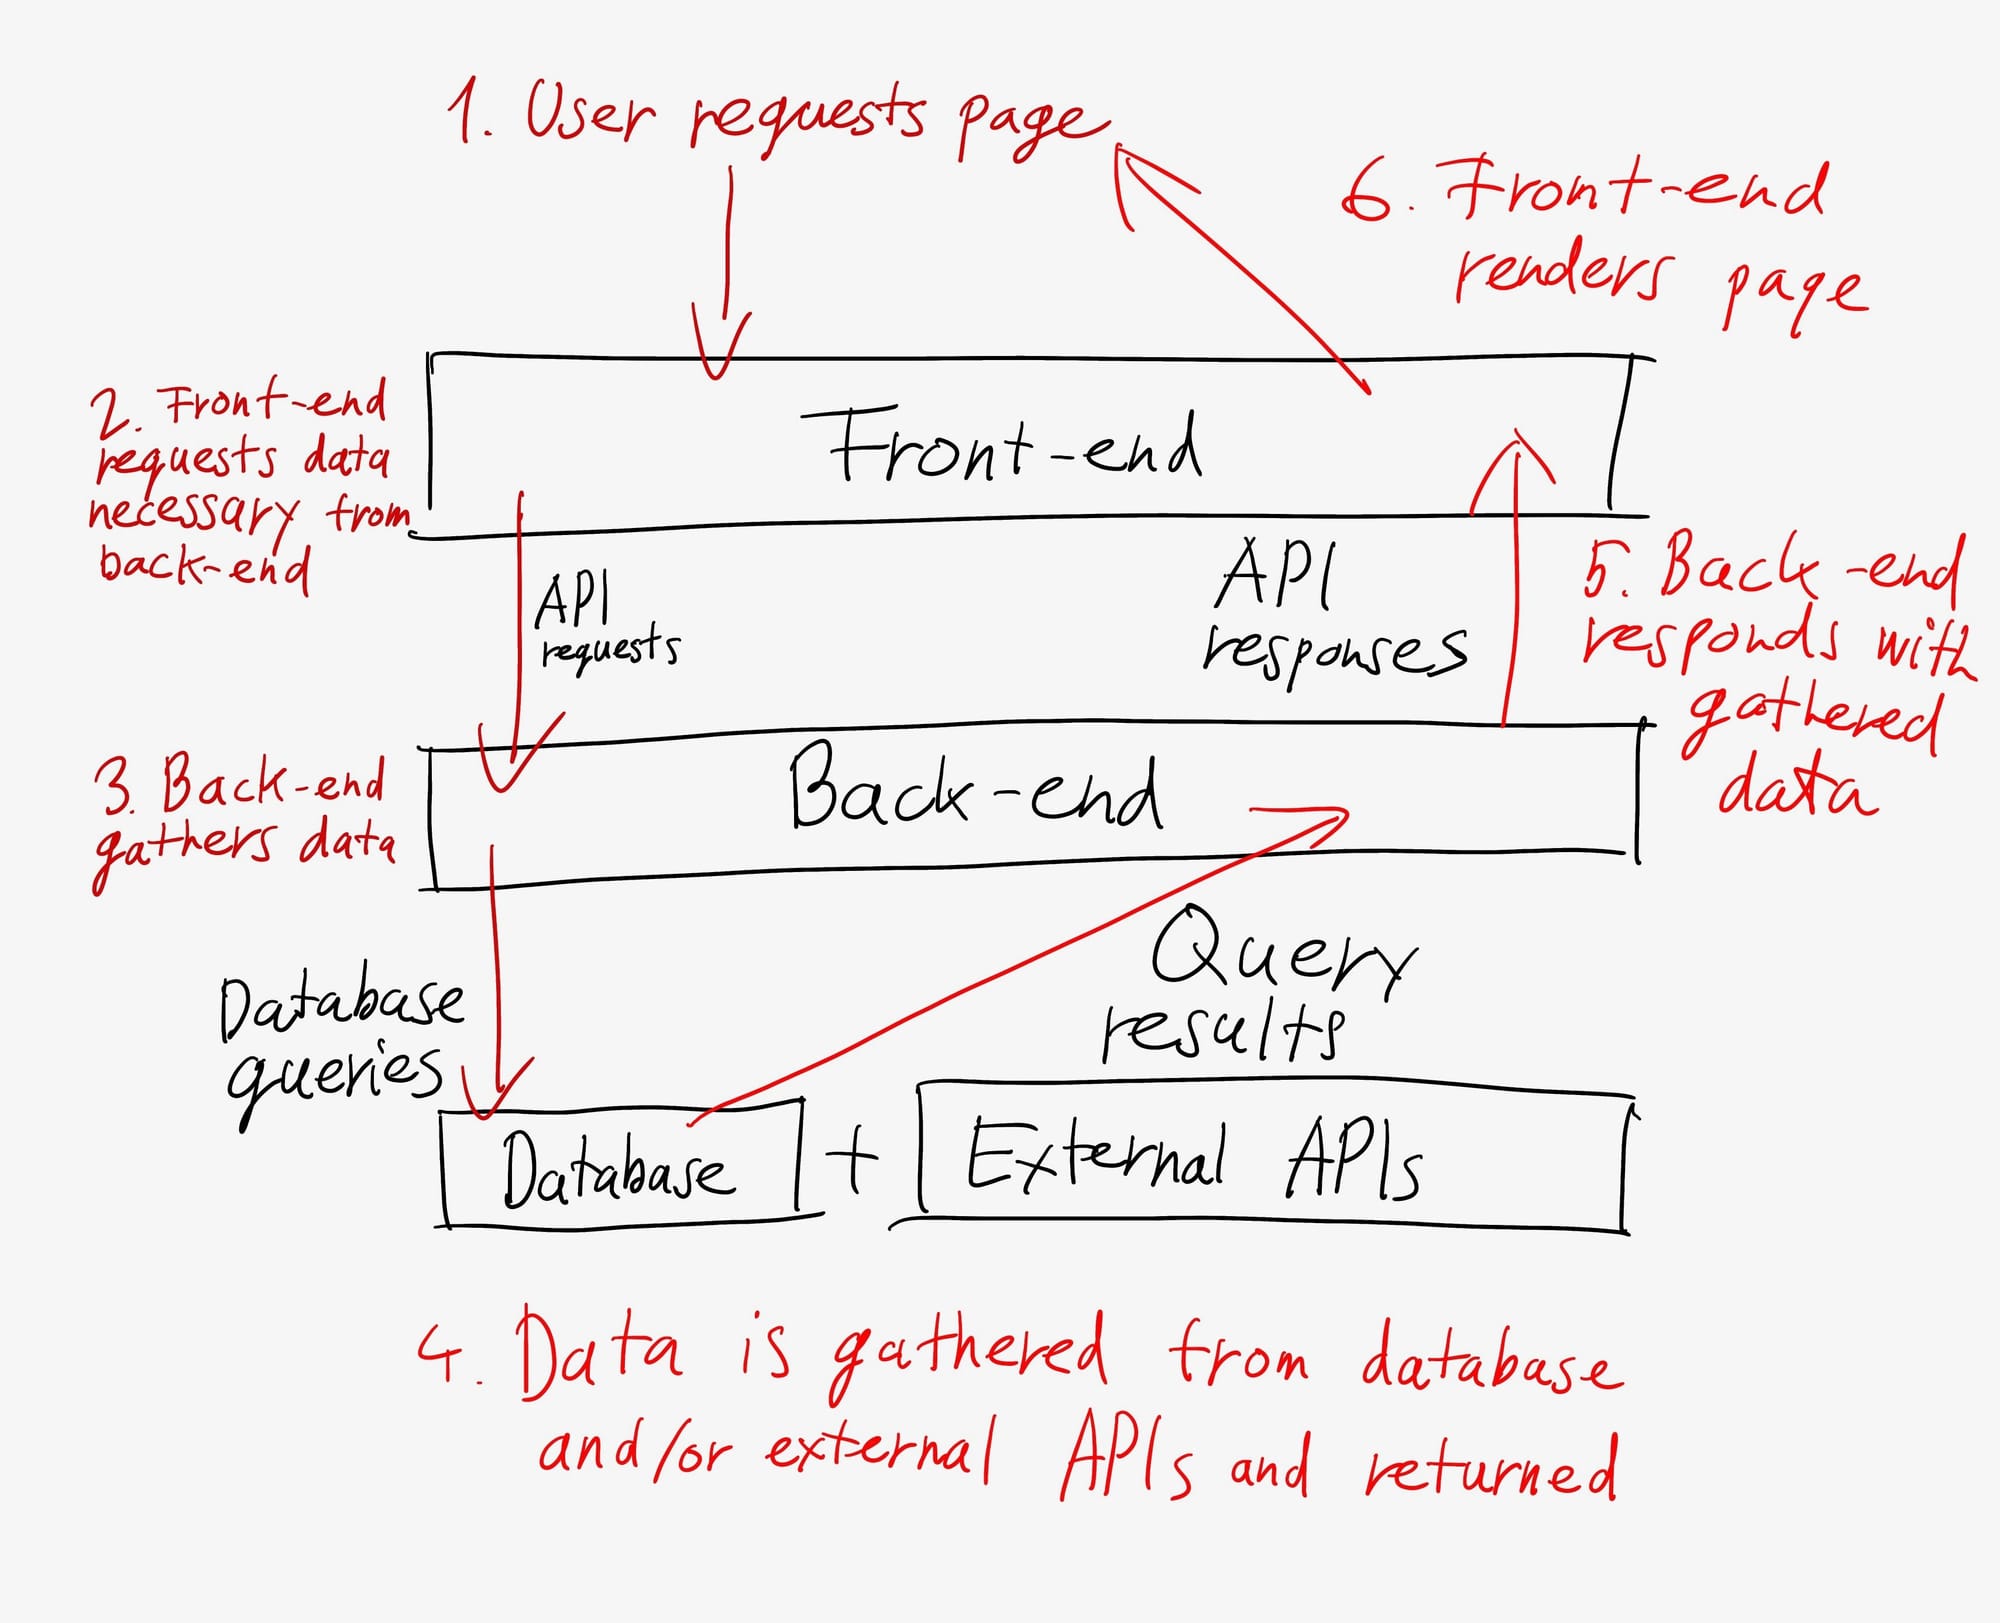
Let's break this down. Our front-end displays our existing pictures and provides an interface to add a new one. To see existing pictures, it needs to get this data from a database. Since the front-end cannot directly talk to a database, mainly due to security reasons, we need a middleman—our back-end—to do this for us.
Our back-end is also part of the same project, but instead of outputting visuals, it outputs and accepts data via REST APIs. These APIs are reachable via URLs, but they usually output JSON, a text representation of data.
The project already created a sample API for us here under pages/api/hello.ts. To see what this returns, check it out in your browser via http://localhost:3000/api/hello.
You should see this:
{
  "name": "John Doe"
}
This is a response in JSON, which is a JavaScript derivative used to represent data passed to and from APIs. This returns an object with the property "name", which has a value of "John Doe". JSON can be used to represent fairly complex pieces of data and transfer it quickly from server to client.
REST API URLs can be fairly descriptive. It's good practice to name your APIs so that a developer can infer their purpose without looking at the code. Here's a possible URL we could create for getting all our existing pictures out of the database:
GET /api/pictures
And here's an example URL we could create for uploading a new picture:
POST /api/picture
But what is GET and POST in front of the URL? REST APIs use the HTTP protocol to communicate, and this means they can use various 'methods' to call an API. Some of these methods are GET, POST, DELETE, and PUT, which you might have heard of. They're descriptive; the best practice is to use GET for getting data, POST to instruct an API to create new records, DELETE to delete them, and so forth.
You can observe GET requests—if they're not authenticated—via the browser. You can directly see the JSON they're responding with, although this might not be easily understandable or well-formatted.
While we can observe GET APIs in most cases, this will not work for other methods. Browsers request website data by using GET requests. If an API requires another HTTP method to return data, you'll need a dedicated program like Postman or a command-line tool, like curl, to observe its responses.
Some APIs, especially POST requests, also need data to complete requests. This data can be in various forms, but often it's a form or a JSON string. We don't want to gather and add this data manually, though. How do we make this happen in our application?
NextJS sells itself as a full-stack framework. This means it can act as a front-end, back-end, or both at the same time. It can show us a visual GUI and serve APIs to fill it with data as well. Creating APIs in NextJS is very similar to creating pages. We work in the same folder, but with a few differences.
First, we need to put all our files representing API endpoints into the pages/api folder. Since we're building endpoints that return JSON, we're not going to create .tsx files, but rather .ts files. We mentioned the pages/api/hello.ts file earlier. We'll use this as our starting point for creating the /api/pictures endpoint.
Creating our first endpoint
Let's create a new file in pages/api called pictures.ts by copying hello.ts in the same folder. This looks like this by default:
// Next.js API route support: https://nextjs.org/docs/api-routes/introduction
import type { NextApiRequest, NextApiResponse } from "next";

type Data = {
  name: string;
};

export default function handler(
  req: NextApiRequest,
  res: NextApiResponse<Data>,
) {
  res.status(200).json({ name: "John Doe" });
}
This file consists of import statements, a type declaration for what the responses should look like, as well as a handler, which is the function an api endpoint needs to handle incoming requests. Right now this function only creates an JSON object response, containing one field name and it's value John Doe.
We'll still need the imports, which are classes provided by NextJS to access API request and response information. What we need to first swap is our response type. We need to do this so typescript knows what fields a picture stored in our database will have. We will also need this type when building our database later.
Defining our data types
Create a folder in the root of your project called types. In this folder, we should create a file named picture.ts. This file will hold the various data types we create for the project, related to picture handling, such as the database representation of a picture, as well as request & response objects. Here, we'll define our first type:
type PictureRecord = {
    id: string;
    name: string;
    url: string;
    created_at: string;
};

type PictureListResponse = {
    pictures: PictureRecord[];
};
The PictureRecord type represents a picture stored in our database with information we can use to display it on the front-end. The PictureListResponse is a way for us to simply represent the data our back-end needs to return via our endpoint handler. It's nothing more than a list of PictureRecord objects. We can update our endpoints file in pages/api/pictures.ts to use this type for our response. We can also add placeholder data to our handler to return 6 pictures for our front-end. Let's move the picture list from our front-end, to here:
// Next.js API route support: https://nextjs.org/docs/api-routes/introduction
import type { NextApiRequest, NextApiResponse } from "next";

export default function handler(
  req: NextApiRequest,
  res: NextApiResponse<PictureListResponse>,
) {

  const images = [
    "face1.jpeg",
    "face2.jpeg",
    "face3.jpeg",
    "face4.jpeg",
    "face5.jpeg",
    "face6.jpeg"
  ]

  const imageResponsePlaceholder = images.map((image, index) => ({
    id: index,
    name: image,
    url: image,
    created_at: new Date().toISOString()
  }) as PictureRecord);

  res.status(200).json({ pictures: imageResponsePlaceholder });
}
Using React hooks, useState and useEffect
If you save this and reload the site, nothing will change. To take advantage of our new API endpoint, we'll need to update our front-end call it. To do this, we'll introduce two new React concepts, useState and useEffect. These hooks are built-in functions in React that run in a specific, predefined manner to manage state and side effects in functional components.
- useState is a way for the front-end to store the current 'state' of a variable without saving it in a permanent way. For example if a user interacts with a text field on your front-end, you may want to track the text they typed into the field via a stateful variable. This way you can keep track of the necessary data before saving it to a database. We'll take advantage of state to hold the list of pictures we received from the back-end.
- useEffect is React and NextJS's way to run code when a change occurs in a stateful variable. We can observe changed to one of multiple variables, or if no variable is observed, we can run code when the component or page initially loads. This is useful to download data from the back-end after the front-end fully loaded or to reload part of the UI when a variable changes.
To update our front-end, we'll remove the images variable since this static placeholder is no longer needed. Then, we'll create a stateful variable to keep track of images for us. We'll also need to import useState from the react library.
const [images, setImages] = useState<PictureRecord[]>([])
What does this mean? Basically, when creating a stateful variable using useState, we need to define it as an tuple of two variables. First, images is the variable holding our data, which we'll be accessing to render our UI. The second, setImages is a function, which we can use to set the contents of images. This is because we cannot directly set the contents of images, in order for React's state management logic to work.
Here's our updated front-end, after the changes:
import Layout from "@/components/Layout";
import { useState } from "react";

const Home = function () {

  // Stateful variables
  const [images, setImages] = useState<PictureRecord[]>([])

  // Event handlers
  const handleFileChange = (event: React.ChangeEvent<HTMLInputElement>) => {
    const file = event.target.files?.[0] || null;
    if (file)
      alert("File uploaded: " + file?.name);
  };

  // JSX
  return (
    <Layout>
      {/* Top row with title & add picture button */}
      <div className="flex flex-col gap-8">
        <div className="flex flex-row justify-between">
          <div className="flex flex-col">
            <p>
              Tired of the boring backgrounds on your selfies?
            </p>
            <p>
              Drag & drop a picture in here and get a cool new one!
            </p>
          </div>
          <div>
            <label
              className="bg-blue-600 text-white px-4 py-2 rounded cursor-pointer"
            >
              Upload picture
              <input
                type="file"
                className="hidden"
                accept="image/*"
                onChange={handleFileChange}
              />
            </label>
          </div>
        </div>
        <div className="grid grid-cols-1 md:grid-cols-3 gap-4">
          {images.map((image, index) => (
            <div key={index} className="flex flex-col items-center">
              <img src={image} alt={"Random person" + index} className="rounded-lg" />
            </div>
          ))}
        </div>
      </div>
    </Layout>
  );
}

export default Home;
If you save this & update your front-end, you'll no longer see the placeholder images. What gives?
We've replaced the static images array with our stateful variable, but we haven't given it a value yet. We need to make the API call and if it responds with valid data, set the images variable by using `setImages.
This is when useEffect comes into the picture. The default useEffect call consists of two componenets. First, a callback, which is code that runs when the useEffect is called. Second, an array, where we can optionally define which variable changes should trigger the useEffect. If we leave this empty, the useEffect will run the component loads on the visitor's front-end. It should look like this:
  useEffect(() => {
    // This runs when the component mounts
  }, []);
Fetching our images from the back-end
Knowing this, we know where we'll trigger the api to fetch out images. To avoid making the useEffect function too bloated, we'll create an external function that can be called when the component is loaded. Similar to how our the Home page is defined as a function, we'll create a const with a variable name and set it to be a function():
const fetchAllImages = async function() {
	// function contents
}
Note the async keyword here. Since the api call we'll be making takes time to complete, we'll take advantage of javascript's async-await logic. This means our code should 'await' any 'async' call, such as an api call, which needs to run for a period of time, but shouldn't block the website's UI. The async keyword is used to define a function that returns a promise. Inside an async function, you can use the await keyword to pause the execution of the function until a promise completes.
React comes with a built in fetch function, which lets us call a REST api endpoint & return a response.
const response = await fetch('/api/pictures');
Endpoints overwhelmingly return a string response in json format. Before we can use this, we have to parse it from a json string, into an object. Thankfully, the response object returned by fetch has a built in function for this was well.
const data = await response.json();
In two lines, we have our data object, which contains the PictureListResponse we return from /api/pictures. Since we return the images in the 'pictures' property, we need to access them like this: data.pictures. Knowing this, we can set the images variable with the response:
setImages(data.pictures);
This is all we need for a function to fetch our pictures:
const fetchAllImages = async function () {
    const response = await fetch('/api/pictures');
    const data = await response.json();
    setImages(data.pictures);
};
To trigger this on the component load, all we need is call the fetchAllImages() function inside useEffect:
useEffect(() => {
	// This runs when the component mounts
	fetchAllImages();
}, []);
If we reload the page, we'll now see 6 fields:
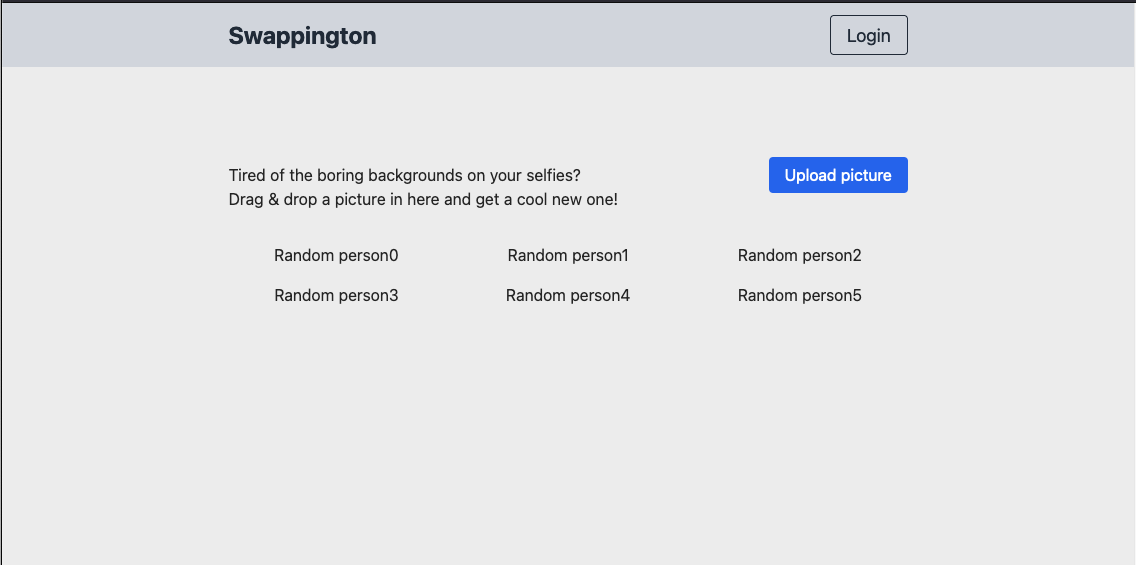
These are not our images! What's going on here? A quick look at the network tab of our inspector (press F12 to bring it up), reveals that we are correctly calling the /api/pictures endpoint. In fact, we're calling it twice!

We'll get back to this in a bit, since this is not the cause of our issue. Looking at our index.tsx file, the editor is underlining the <img src=... part of our code with red. An issue like this is where typescript can help. Hovering over the underlined section, our code editor is warning us of an error in our code:
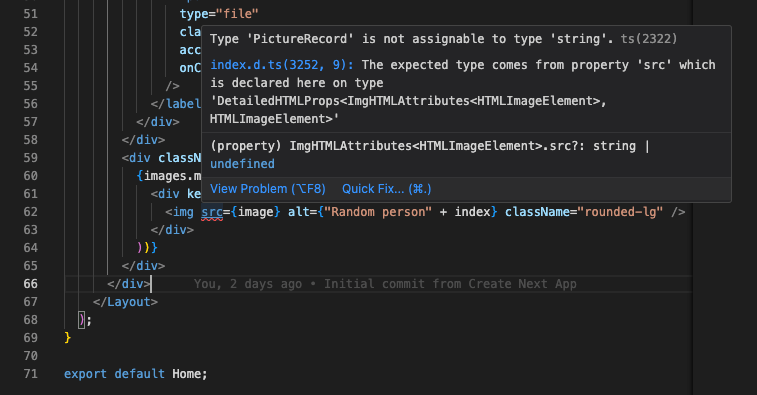
This basically means that currently we're treating images as a list of PictureRecord objects. However, previously we used a list of strings here and we're still trying to set the display <img> tag's src value to image. Since image now a PictureRecord, which has several fields, including url, we need to change our JSX to use image.url instead:
<div className="grid grid-cols-1 md:grid-cols-3 gap-4">
	{images.map((image, index) => (
		<div key={index} className="flex flex-col items-center">
			<img src={image.src} alt={"Random person" + index} className="rounded-lg" />
		</div>
	))}
</div>
After saving, our images are back, since we're now correctly accessing the url inside the PictureRecord objects coming back from our API.

But what is the deal with /api/pictures being called twice? This happens because NextJS enables React's strict mode by default, via the next.config.js or next.config.mjs file. Script mode is meant to be an aide for debugging specific problems with React's built in functions, also known as hooks. useEffect is one of these hooks, but for our purpose, strict mode is not necessary. Disable it like this:
/** @type {import('next').NextConfig} */
const nextConfig = {
  reactStrictMode: false,
};

export default nextConfig;
After saving, we can reload the page and check the inspector again. We should we one call to /api/pictures instead of two:

Preparing our data types for uploads
Now we're ready to move on to uploading new pictures. We need to make the same changes as with our pictures endpoint. First, let's set up our types for uploading a new picture. When creating a picture, we need to let our back-end know the picture's name, as well as give it the actual picture file. Let's expand on our types. Open the types/picture.ts file and add the PictureCreationRequest type:
type PictureCreationRequest = {
    name: string;
    file: File;
};

type PictureRecord = {
    id: string;
    name: string;
    url: string;
    created_at: string;
};

type PictureResponse = {
    picture: PictureRecord;
};

type PictureListResponse = {
    pictures: PictureRecord[];
};
Why make different type for the same data? For creating a picture, you often need less data then what you'll store once the picture is created. Fields such as id, created_at, url are generated by the back-end, once you've uploaded a picture. Our front-end will use the PictureCreationRequest type to send picture data to our endpoint, while the back-end will use the PictureResponse type to respond with the created picture.
Side note:
Storing the uploaded file in the DB is not recommended and we don't want it directly on the disk since this limits our application's future growth and might jeopardise the data. What we'll do instead is have our back-end upload the received file to a remote object storage service, in our case Cloudflare R2. This will keep the uploaded files safe, while allowing us to access them from anywhere. It also means that if we had to run multiple instances of our app, they'd all have access to the same files.
Creating our upload endpoint
Now that we have the type set up, let's create a new back-end endpoint to accept uploaded pictures. Create a picture.ts file in the pages/api folder and add the following placeholder code.
// Next.js API route support: https://nextjs.org/docs/api-routes/introduction
import type { NextApiRequest, NextApiResponse } from "next";

export default function handler(
  req: NextApiRequest,
  res: NextApiResponse<PictureResponse>,
) {

  const createdImageResponsePlaceholder : PictureRecord = {
    id: 1,
    name: "name",
    url: "/url",
    created_at: new Date().toISOString()
  };

  res.status(200).json({ picture: createdImageResponsePlaceholder });
}
This will always return a successful, placeholder response, but we want to expand on this logic to read the uploaded file & add it's details to the placeholder response. Once we're done with this, we'll be ready to add the database layer to our application.
Since our front-end will be uploading a PictureCreationRequest object, we can expect a name and a file property in the request. We can use Next.js's req property to access the request's fields. One important consideration is to ensure that only POST requests can call this endpoint. This is for several reasons:
- Form Submission: Posting a form, such as when uploading a file, is not possible with a GET request.
- Data Security: GET requests expose all parameters passed with the request in the URL, making them unsuitable for transmitting sensitive data. POST requests, on the other hand, sends data in the request body, which is not exposed in the URL.
For these reasons, you'll often see POST requests used for submitting data, especially when dealing with file uploads or sensitive information.
Receiving the uploaded image in the back-end
To parse the uploaded form, we'll need to also pull in formidable our first dependency. A dependency is a package or piece of code written by a 3rd party, which you can use in your own project. Formidable is a package used for parsing & handling uploaded forms in NodeJS applications, like ours.
In your terminal, navigate to our project folder and run the following command:
yarn add formidable && yarn add -D @types/formidable
This will install formidable and it's typescript types. After this, we'll be able to use formidable's code in our endpoint to handle an uploaded form. NextJS by default doesn't expect form uploads, so we have to disable it's default parser in our upload endpoint. This is something you only need to do when dealing with the FormData class.
export const config = {
  api: {
    bodyParser: false,
  },
};
We need to create a new instance of formidable to handle form parsing for our request.
const form = formidable();
This gives us access to a form object, which has built in methods to parse the files and fields uploaded with our request. form.parse() will attempt to process the form and return it's contents in a callback. This is another form of asynchronous code, much like the async-await approach we've used before. One thing to note is that when working with callbacks, the execution of the rest of the code will continue beyond where the callback is defined. The inside of the callback will only execute when it receives a parsed form.
This is a barebones form parse callback to get us started:
form.parse(req, (err, fields, files) => {
    if (err)
      return res.status(500).json({ error: 'Error uploading file' });

	// Missing form content validation code

    const createdImageResponsePlaceholder: PictureRecord = {
      id: 1,
      name: 'No name',
      url: `/somePath`,
      created_at: new Date().toISOString(),
    };

    res.status(200).json({ picture: createdImageResponsePlaceholder } as PictureResponse);
});
From here, we need to access the file contents and the 'name' field and assemble a PictureCreationRequest object from them. Note that the file itself also contains an original name field, but for the sake of showing how to parse fields in a form, it's handy to handle this separate from the file.
Thankfully if there were no errors (err) returned by the form parsing, we should have access to our data. We can handle the possible cases of missing data by returning 400 responses. This is a http response code that signifies a 'bad request', which means our requestor -in our case our own front-end- didn't send the correct data with the request.
I've added some some validations to check if our file and name are there. If they are, we set them to the filed and fileName variables:
let file = null;
let fileName = null;
There are not const variables because const cannot be modified, while let can. Initially I set these to null and if the form is parsed and data present, they should be filled when we get to the end of the validations:
if (files && files.file) {
  file = files.file[0];
  console.log(file.filepath);
} else {
  return res.status(400).json({ error: 'No file uploaded' });
}

if (fields && fields['name']) {
  fileName = fields['name'][0];
  console.log(fileName);
} else {
  return res.status(400).json({ error: 'No fields uploaded' });
}
Formidable returns three optional objects: err, fields and files. It places files in the files object, while other values we passed will go into fields. The structure is not straightforward.
In the case of the files object, it contains the file object we passed, but since the form could contain multiple files, it is returned by formidable as an array. We need it's first item only.
For fields the situation is similar. Our other values are directly added to fields, but due to typescript not knowing about what properties the fields object has, we need to access them directly. The name field also got parsed as arrays by formidable, yet we only need it first value.
At the end we have our file and fileName values and we can return them to our front-end as validation that all went well. Here is our updated upload endpoint:
// Next.js API route support: https://nextjs.org/docs/api-routes/introduction
import formidable from "formidable";
import type { NextApiRequest, NextApiResponse } from "next";

export const config = {
  api: {
    bodyParser: false,
  },
};

export default function handler(
  req: NextApiRequest,
  res: NextApiResponse<any>,
) {

  if (req.method !== 'POST')
    return res.status(405).json({ message: "Method Not Allowed" });

  const form = formidable();

  form.parse(req, (err, fields, files) => {
    if (err)
      return res.status(500).json({ error: 'Error uploading file' });

    let file = null;
    let fileName = null;

    if (files && files.file) {
      file = files.file[0];
      console.log(file.filepath);
    } else {
      return res.status(400).json({ error: 'No file uploaded' });
    }

    if (fields && fields['name']) {
      fileName = fields['name'][0];
      console.log(fileName);
    } else {
      return res.status(400).json({ error: 'No fields uploaded' });
    }

    const createdImageResponsePlaceholder: PictureRecord = {
      id: 1,
      name: fileName ?? 'No name',
      url: `/${file.filepath}`,
      created_at: new Date().toISOString(),
    };

    res.status(200).json({ picture: createdImageResponsePlaceholder } as PictureResponse);
  });
}
Updating our front-end code for uploads
Now we're ready to update our front-end to call this endpoint when we upload a new picture. Like the fetchAllImages function, we'll create a new function to upload an image. We'll also use fetch here, but with a few more parameters:
We'll create a FormData object, which is a built in type for defining contents for a form POST API call. This allows us to add the keys our back-end endpoint requires. We want to match the PictureCreationRequest type, which we'll use to handle the uploaded data internally. Create a new Formdata() object and append the name and file keys to it like so:
const formData = new FormData();
formData.append('name', file.name);
formData.append('file', file);
We define a similar fetch function here, but instead of only providing the /api/picture endpoint to it, we need to specify two things:
- The request method, representing the HTTP method we'll be using. In this case it is
POSTsince we're uploading something with the intent to create data in our back-end. - The request body, which holds the information we want to upload. This will be the form data we defined earlier.
const response = await fetch('/api/picture', {
	method: 'POST',
	body: formData,
});
Lastly, we also need to parse the response to see if our upload was a success. Putting it together, we have our upload function:
const uploadImage = async function (file: File) {
	const formData = new FormData();
	formData.append('name', file.name);
	formData.append('file', file);

	const response = await fetch('/api/picture', {
		method: 'POST',
		body: formData,
	});
	const data = await response.json();
	console.log('File upload response received:', data);
}
No we need to trigger this upload in our handleFileChanges function we've used for printing the uploaded picture's filename on the screen. if the function receives an event with a file, we can instead trigger the uploadImage function:
const handleFileChange = async (event: React.ChangeEvent<HTMLInputElement>) => {
	const file = event.target.files?.[0];
	if (file)
		uploadImage(file);
};
If you reload the page and try to upload an image now, you should not see any feedback. But if you open the inspector using F12 and look at the network tab, you should see a POST request done to the /api/picture endpoint.
![[upload_req.png]]
If you click on this request and take a look at the response tab, you'll see the JSON our back-end sent back:
{
    "picture": {
        "id": 1,
        "name": "balcsi.jpg",
        "url": "//var/folders/dz/b2w14fl97tjbyvphxzkwc3080000gn/T/337216a0a6caeecf6db853501",
        "created_at": "2024-07-28T08:34:13.043Z"
    }
}
Great! Now we have both our back-end and front-end set up and configured for file uploads. However, even though our flow is working end to end, we're not saving the uploaded files. For that, we need to first create a database row for our picture, then upload it to a remote file storage solution.
Since we've gone on for a long while in this article as well, we'll take care of these todos in part 3 of the series! Next up: Setting up our Database & Remote Object Storage in Cloudflare.

If you like what I do, buy me a beer:


